SirenOSC Tutorial - V1.2.0
INFORMATION
SirenOSC is a program made by me to help with siren experimentation like testing Rotor Designs, Motor RPM, Ports, Vanes, and Timbre. You can also use it as a Siren Synth maker or whatever I don't even care, as long as you don't use it illegally or maliciously.
The Current Version is Release V1.2.0. It is available at https://sirenosc-webdemo.netlify.app/ as a web demo, but It will be ported as a VST3, compatible with programs like Audacity and FL Studio sometime in the future.
For people coming from my channel, yes I'm still working on Part III of How does a siren work?, but I'm working on this for now because I'll need this project for the series I'm doing after that series.
AUDIO PROBLEMS?
A common problem with iOS users is that if you move to another tab and return to this website with no audio even with the rotor diagram spinning, scroll to the bottom of the page and click Reset Settings. If that doesn't help, try disabling the effects by clicking the Gear Icon and disabling effects.
If that still doesn't work, make sure you have updated your browser and OS to its latest update, else you can email me at earesmuck@gmail.com and I'll see if I can do anything to fix it on my side.
PRESET MANAGER
The Preset Manager is basically a Save/Import settings. If you click the Save Preset button, a Pop-up will show up with containers for the Model, Manufacturer, Creator, and Description of your Preset. Once you have filled that out, you can download it as an .oscp file. You can also use the Load Preset import .oscp files to use your pre-existing/other peoples presets. There is an indicator next to the Save Preset button that will show ● when the Saved/Loaded preset is in use, and ● if it has been modified or not yet saved.
There 5 formats you can save your presets in
File Type | File Extension | Saved Settings |
SirenOSC Full Preset | .oscp | All settings included. |
SirenOSC Control Preset | .oscc | main.json, control.json |
SirenOSC Timbre Preset | .osct | main.json, timbre.json |
SirenOSC Model Preset | .oscft | main.json, timbre.json, functions.json |
SirenOSC Effects Preset | .oscfx | main.json, effects.json, blower.json |
SirenOSC R/C Preset | .oscrc | main.json, rotation.json, constants.json |
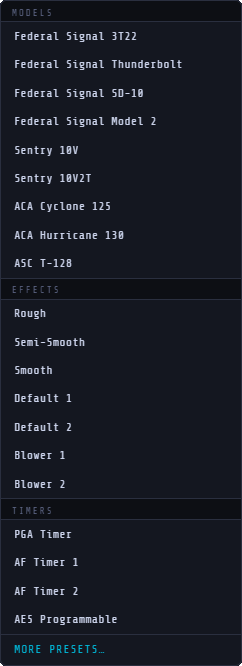
There are also 20 built-in presets. 9 full presets, 7 effects presets, and 4 controller presets. These can be loaded in via the Built-In Presets button that is next to the Load Presets button.
The Models include the
The Effects include
The Timers include
More Dev Presets are available in the Google Drive Folder.
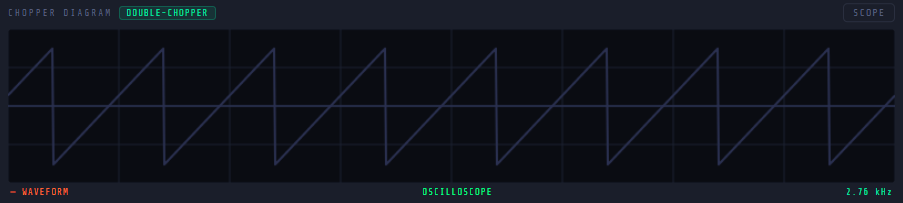
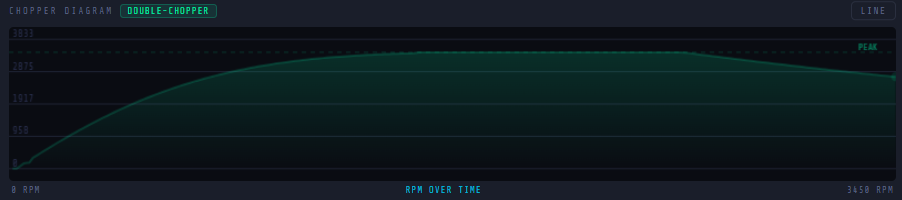
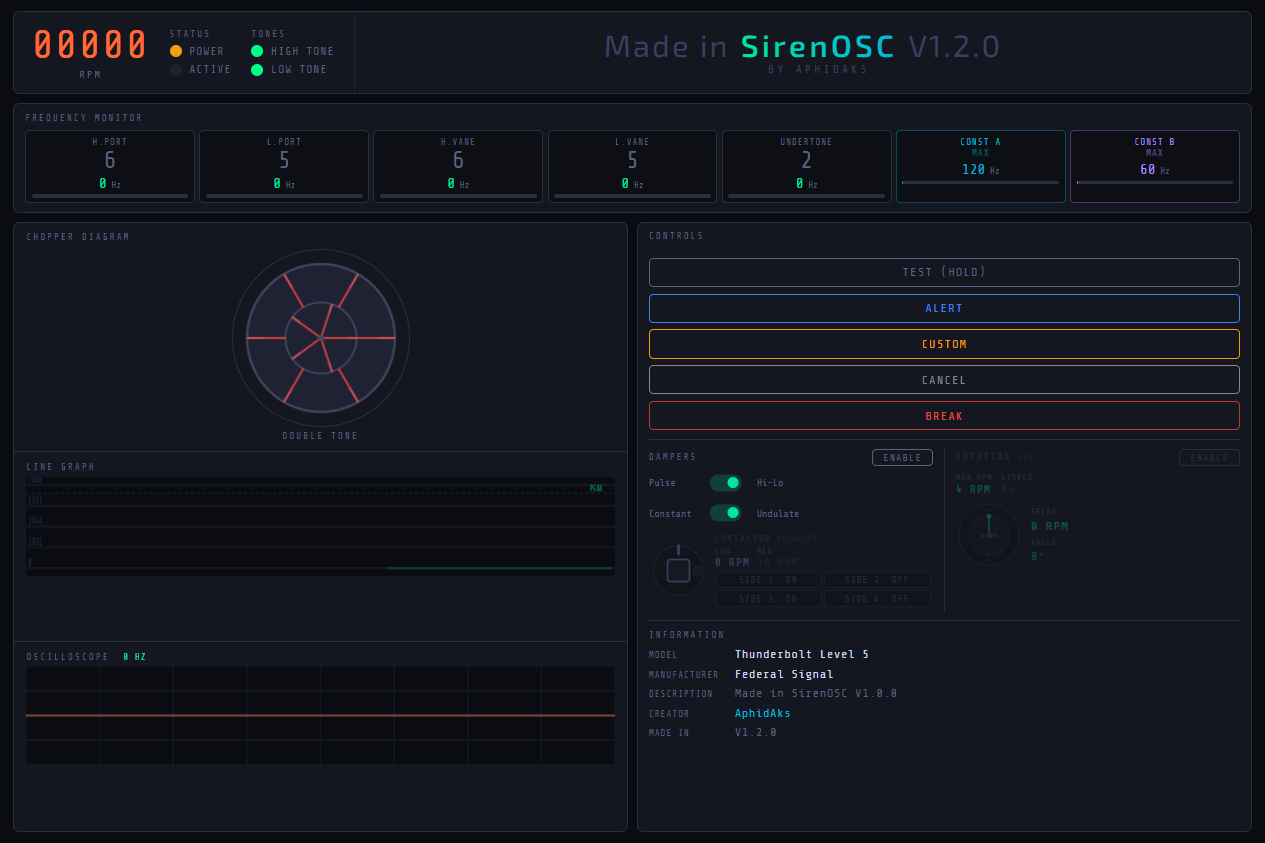
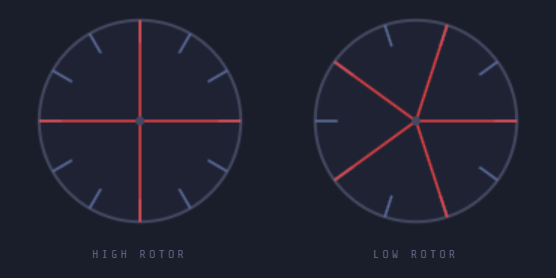
CHOPPER DIAGRAM
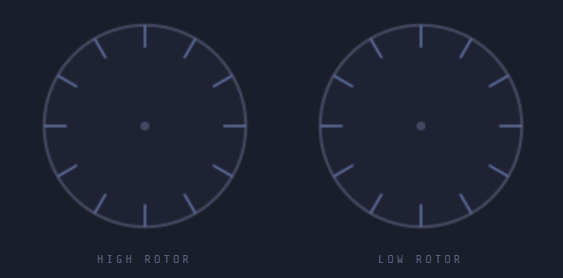
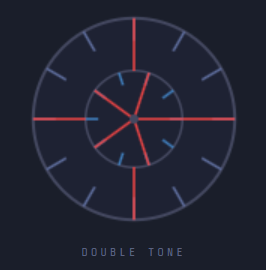
The Chopper Diagram will show a diagram of the current chopper configuration.
If you are using the Single-Tone configuration, there will be one rotor.
If you are using Double-Tone configuration, there will be one rotor with two rows of ports.
If you are using Double-Chopper configuration, there will be two rotors.
The Length of the Vanes can also be changed using the H. Vane and L. Vane Length sliders in the Timbre.
You can hide the Vanes with the Hide High Vanes and Hide Low Vanes buttons
The rotor also rotates at the same rate as the Current RPM. You can use the Disable Animation button to turn this off.
You can also click the Diagram button on the upper-right corner for other modes including…
Line Graph Mode
or Oscilloscope Mode
TIMBRE
This is what the Timbre section looks like.
By using this, I expect you to have at least basic knowledge about sirens, if you don't, you can watch the videos in this playlist to help you learn more about sirens.
Higher/Lower Port - The amount of Ports on a Single-Tone chopper, or the amount of Ports on the Higher and Lower rows on a Dual-Tone chopper, or the amount of Ports per chopper if for Dual-Choppers. This is the fundamental character of the sound.
Higher/Lower Vanes - The amount of Vanes on each chopper. This can produce a sub-fundamental if its a lower value from the ports. You can hear it in a Sentry 10V as a tone an octave lower, many people mistake it for the undertone but it's actually just the 4 Vanes which is half of the 8 Ports on the chopper.
Undertone - This is the undertone, or the main resultant tone, you can autofill or calculate it as the GCF of the Higher and Lower port. This is produced when an imbalanced flow of air exits through the chopper.
Peak RPM - This is the maximum speed of the chopper motor, common RPMs are 3450 (North American Sirens), 2880 (British Sirens), and if the port ratio is 6 or below, it's probably double that like, 6396 (Model 2) or 7200 (Common Thunderbolt).
Chopper Config - You can choose either Single-Tone (1 chopper, 1 row of ports), Double-Tone (1 chopper, 2 rows of ports), or Double-Chopper (2 choppers, 1 row of ports each). Single-Tone disables the Lower Port and Vanes. Double-Chopper adds a 65% volume cap on the Undertone.
Waveform - Choose the oscillator waveform, sawtooth is the most natural to sirens, but you can also choose other waveforms.
Indicators - Here you can see sound meters and the frequency of each oscillator in Hz.
MIXER - You can change the volume of each oscillator here. As mentioned earlier, changing the H. Vane and L. Vane Lengths also change the lengths in the diagram. It will be at full length at 40% and when you go higher, their simulated height changes. One tip is that the higher port and vanes usually have a dominant volume over the lower port and vanes by 5-8%.
Detune - You can detune the output to account for motor degradation and other factors.
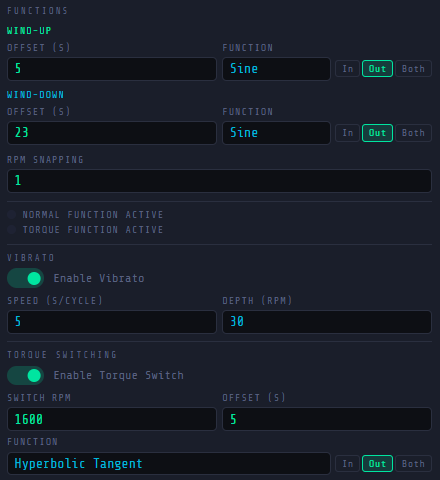
FUNCTIONS
This is what the Functions section looks like.
This is the area where you can change the mathematical functions on the wind-up and wind-down on each siren. I suggest watching this video for more information.
Wind-Up - This controls the Wind-Up of the siren, or when the siren has been connected to the power.
Wind-Down - This controls the Wind-Down of the siren, or when the siren has been disconnected from power.
Function - The mathematical equation used to sweep the Wind-Up. I'd say linear is the least realistic for electromechanical sirens and sine is the most commonly used.
Offset - The part of the equation that controls the speed or amount raised by each iteration. Higher values give longer curves.
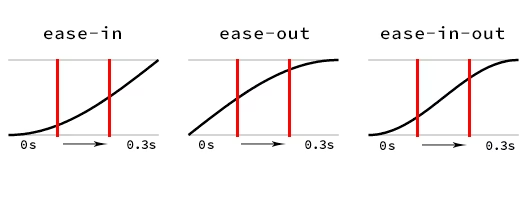
In/Out/Both - The easing of the curve.
RPM Snapping - Once the chopper RPM meets a point that is ± of this value to its Peak RPM, it will snap to the Peak RPM. This is useful for functions that don't reach Peak RPM.
Vibrato - You can use this to add vibrato to the RPM, it will go from Current RPM to Current RPM plus Depth (RPM) then return to Current RPM in Speed seconds.
TORQUE SWITCHING - When a siren starts winding-up again while in a high RPM (like right after a short wind-down period), it requires less torque to spin it to peak RPM, therefore spinning it faster. Torque Switching simulates that behaviour, a faster offset and/or function is used to provide a faster return.
Switch RPM - The minimum RPM where the Torque Switched equation will be used.
CONTROLS
Lets you control the sirens motors, switches, and solenoids.
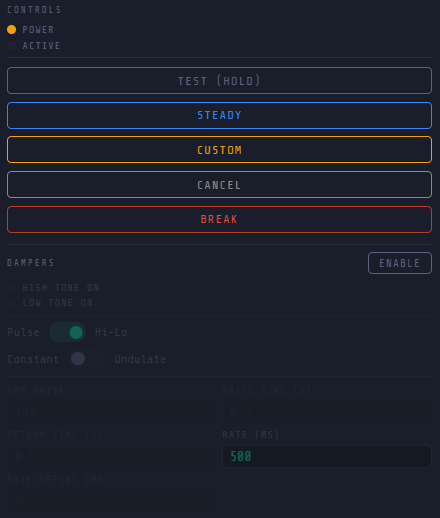
This is what the Controls section looks like.
Made to imitate a variety of common timers and controllers.
Power Indicator - Always ON
Active Indicator - ON when a signal is active
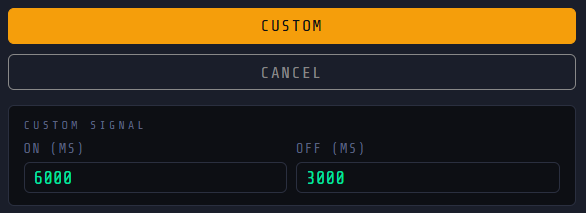
TIMER - Lets you control the sirens ON and OFF durations.
Test - Turns the siren ON for as long as it is pressed.
Steady - Turns the siren ON until the cancel button is pressed
Custom - Lets you create a custom signal with an ON and OFF cycle that repeats until the cancel button is pressed
Cancel - Exits the Steady or Custom signal and cuts power to the siren.
Break - This instantly stops the chopper, bringing it to 0 RPM.
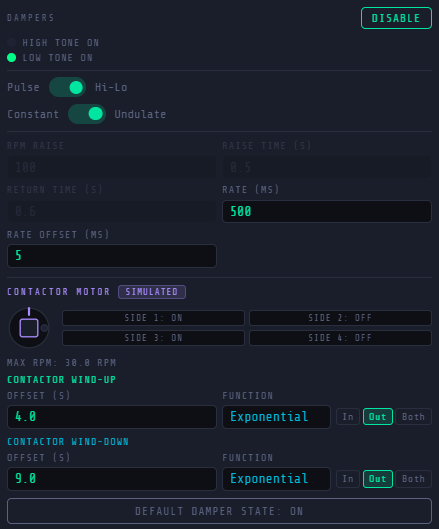
DAMPERS - Enables Dampers or Solenoids to create Pulse/Hi-Lo Signals
High Tone Indicator - Indicates if the High Tone Oscillators are Active
Low Tone Indicator - Indicates if the Low Tone Oscillators are Active
Pulse/Hi-Lo Switch - Switches between Pulsing, which turns both oscillators on and off in a cycle and Hi-Lo mode, which alternates between oscillators in a cycle.
Constant/Undulate - Switches between Constant, which constantly updates the dampers at all times at a constant precise rate and Undulating mode which uses a simulated contactor motor, causing the rate of update to go higher as it starts until the maximum rate, it also only occurs during wind-up and steady phases.
RPM Raise - Raises the RPM when all dampers are blocked on pulse. This occurs in real sirens since less air resistance in the rotors lets the motor run faster.
Raise Time - Time for the RPM to rise starting on damper activation.
Return Time - Time for the RPM to return to normal RPM on damper deactivation.
Rate - Maximum Rate in which the dampers will update.
Rate Offset - Imperfections added to the Rate from Contactor Motor behaviour.
Contactor Motor Diagram - Shows the spinning conductive timer as it spins to imitate undulation.
Contactor Wind Up - Controls the contactor motor wind-up
Contactor Wind Down - Controls the contactor motor wind-down
Default Damper State - Sets the normal damper shutdown state.
EFFECTS
Adds modifiers to the sound that make it sound more realistic.
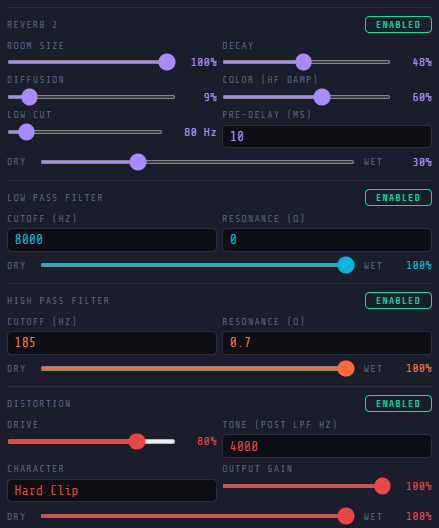
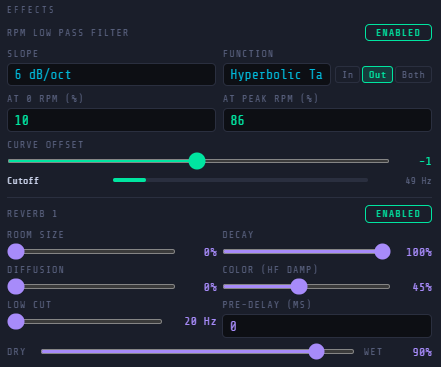
This is what the Effects section looks like.
RPM LOW PASS FILTER - Changes the harmonic capacity of the sound based on the current RPM.
Slope - Strength/Depth of the cutoff.
Function - Function for the curve of the RPM mapping.
At Zero RPM - Cutoff at 0 RPM.
At Peak RPM - Cutoff at Peak RPM.
Curve Offset - Changes the steepness of the curve of the RPM mapping.
REVERB 1 - Smoothens the tone from harsh digital noise to continuous tone.
REVERB 2 - Adds a reverb to simulate outside conditions.
Room Size - Controls the size of the space.
Diffusion - Controls the broadness of scattered sound reflections.
Low Cut - Low pass filter.
Decay - The duration for the reverberated sound to fade away.
Color - The tonal character of the reverberated sound.
Pre-Delay - Delay before the reverberated sound occurs.
Dry-Wet Ratio - Mix of input audio signal and output audio signal.
LOW PASS FILTER - Constantly cuts the sound above a specified frequency
HIGH PASS FILTER - Constantly cuts the sound below a specified frequency
Cut-off - The frequency where the sound cuts off.
Resonance - Boost of frequencies near the cut off frequency.
Dry-Wet Ratio - Mix of input audio signal and output audio signal.
DISTORTION - Fills the tone into a complete output.
Drive - The amount of clipping that occurs in the audio.
Tone - Low Pass Filter.
Character - The type of distortion applied to the sound.
Gain - Added volume to audio.
Dry-Wet Ratio - Mix of input audio signal and output audio signal.
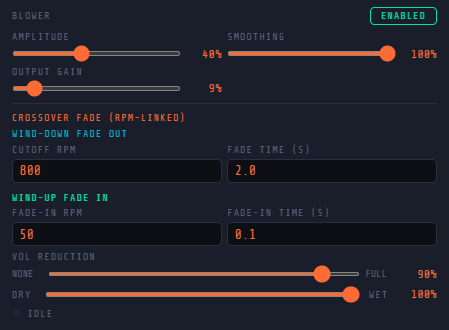
BLOWER
Distorts the sound, similar to what a supercharged siren does.
This is what the Blowers section looks like, which is in the Effects section.
Turning this effect on will disable the Reverb 1 effect by default as having them both in use at the same time leads to a severely bitcrushed output.
Amplitude - Clipping strength of the Crossover Distortion.
Smoothing - Controls the smoothness of the clipping and dead space.
Output Gain - Added volume to audio.
Cutoff RPM - RPM point where the audio gets reduced to a minimal volume to simulate the blower shutting down.
Fade In RPM - RPM point where the audio starts to get louder to simulate the blower starting.
Fade Time - Time it takes for the blower to shut-down.
Volume Reduction - How much the volume is reduced when the blower is shut-off.
Dry-Wet Ratio - Mix of input audio signal and output audio signal.
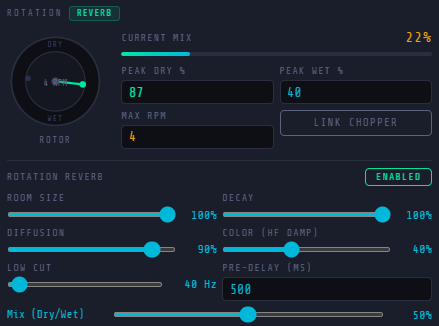
ROTATION
Simulates a siren rotating, causing the reverb to intensify and weaken.
This is what the Rotation section looks like.
Current Mix Indicator - Shows what state is currently dominant over the other.
Rotating Diagram - Shows the rotation of the siren relative to a constant position.
Peak Dry - Mix of Input Signal over Output Signal in Maximum Dry State.
Peak Wet - Mix of Output Signal over Input Signal in Maximum Wet State.
Max RPM - Maximum RPMs done by the rotator motor.
Link Chopper - Links the rotation speed to the chopper, as the chopper's speed decreases, the rotation speed will also decrease.
Room Size - Controls the size of the space.
Diffusion - Controls the broadness of scattered sound reflections.
Low Cut - Low pass filter.
Decay - The duration for the reverberated sound to fade away.
Color - The tonal character of the reverberated sound.
Pre-Delay - Delay before the reverberated sound occurs.
Dry-Wet Ratio - Mix of input audio signal and output audio signal.
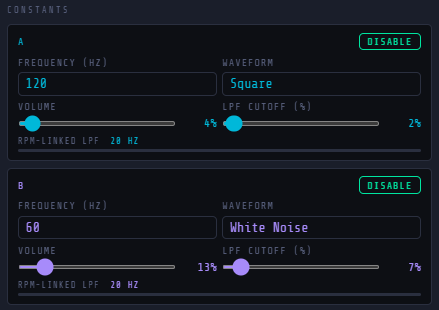
CONSTANT
Simulates a constant unchanging tone, to simulate blower noise or motor hum.
This is what the constants section looks like.
Frequency - Frequency of the oscillator.
Waveform - Waveform of the oscillator.
Volume - Maximum volume of the oscillator.
LPF Cutoff - LPF Cutoff linked to the chopper RPM.
RECORD MODE
If you scroll down to the bottom, you will see a button to enter record mode
This will let you enter a UI with every necessary Indicator, Graphs, and Diagrams. Very useful if you're making a video showcasing your preset or you just want a layout where you can see everything.
Also light mode exists in the settings. I wouldn't recommend it though because I got permanent vision damage after viewing it for 0.25 seconds at 1AM in the morning (jk).
FUTURE UPDATES
I may add more features in the future, and bug fixes. You may contact me via my reddit (u/aphidaks69) or email me (earesmuck@gmail.com).
Thanks!
© 2026 AphidAks, Licensed under CC BY-NC-SA 4.0